York 304 SA/York 316 SA – Self Adhering Stainless Steel Installation Instructions
This document is intended to provide uniform procedures and installation instructions for the designer and end user, for York 304 SA and York 316 SA installation as a through wall flashing and as a transition membrane. It is important to review the intended application of the product as it can vary for each project due to jobsite conditions. Project-specific modifications may be required to achieve the intended performance, provided such modifications are reviewed and approved by York Flashings Technical Team when they deviate from these instructions. Contact York Flashings Technical Team for assistance, additional guidance not provided in this document, or approval of project-specific deviations from these recommended installation practices.
PURPOSE:
York 304 SA / York 316 SA is a flexible self-adhering stainless steel membrane. It is designed with a flexible facer layer of 2 mils (0.002”) of Type 304/316 stainless steel, a butyl block copolymer adhesive layer, and a siliconized release liner. York 304 SA / York 316 SA is a self-adhering metal membrane commonly used as a through-wall flashing and transition membrane compatible with most air barriers, polyurethane foam, insulation boards, waterproofing membranes, roofing membranes, and construction sealants, subject to written compatibility confirmation where required.
LIMITATIONS:
1) UV exposure shall not exceed the lesser of the published UV-exposure limitation of the edge sealant or 180 days after installation.
2) Do not apply to damp, dirty, contaminated or frost-covered surfaces.
3) York 304 SA / York 316 SA shall not be installed as a permanently exposed surface.
4) Petroleum-based or asphalt-based mastics shall not be used where encapsulated or where they may remain uncured, soften adjacent materials, or adversely affect adhesion.
5) York 304 SA / York 316 SA shall not be installed directly onto silicone fluid-applied membranes or sealants, unless otherwise reviewed and approved by York Flashings Technical Team.
6) York 304 SA / York 316 SA shall not be installed directly onto PMMA waterproofing membranes unless otherwise reviewed and approved by York Flashings Technical Team. Due to different PMMA formulations, some applications will require primers to attain proper long-term adhesive performance, unless confirmed by project-specific adhesion testing and written manufacturer guidance.
TEMPERATURE RANGE:
1) Allowed Application Temperature*: 20°F to 170°F
2) Recommended Application Surface Temperature*: 40°F to 100°F
3) Service Temperature**: -70°F to 250°F
* York 304 SA / York 316 SA may be installed when the substrate temperature is between 20°F and 170°F, provided the substrate is dry, clean, sound, and acceptable for membrane adhesion. Application temperature shall be measured at the substrate at the moment of application. For best installation performance, York recommends installation when the substrate temperature, membrane, and ambient air temperature are between 40°F and 100°F. Application outside the recommended 40°F and 100°F installation range may require additional precautions and review by York Flashings Technical Team.
** Service temperature applies only after York 304 SA / York 316 SA has been installed, hard rolled, edge sealed as required, and allowed adequate dwell or curing time to achieve proper adhesive bond and sealant cure; it should not be used as the allowable application-temperature range during installation.
STORAGE / SHELF LIFE:
Store York 304 SA / York 316 SA in its original packaging, on end, in a clean, dry protected location with temperatures not exceeding 100°F. Shelf life shall be no more than 2-years, given the product is stored as indicated.
FIELD STORAGE:
During construction, store rolls elevated off the ground, protected from moisture, direct sunlight, precipitation, frost, snow, dirt, dust, and construction contaminants.
In summer or high heat conditions, store rolls in a shaded and ventilated location. Do not store rolls in closed trucks, unventilated trailers, metal gang boxes, on roof decks, on pavement, or in direct sunlight where roll temperatures may exceed 100°F.
In winter or cold weather conditions, store rolls in a heated or conditioned location at a minimum temperature of 50°F for at least 24 hours before installation. Keep rolls dry and protected until immediately before use.
ACCESSORIES:
York Flashings provides various accessories to be used in conjunction with York 304 SA / York 316 SA.
1) UniverSeal US-100 Liquid Tape (York US-100) – Required as edge sealant or construction sealant
2) Weep-Net
3) Termination Bar T-96
4) Stainless Steel Accessories – Termination bar, drip edge, end dams, inside and outside corners, stainless steel weep vents, stainless steel angles
SUBSTRATE PREPARATION AND DETAILING:
York 304 SA / York 316 SA can be applied to most air barriers, spray polyurethane foam, insulation boards, below grade waterproofing/damp proofing, roofing membranes, and construction sealants, as well as typical building materials such as exterior sheathing boards, CMU, concrete, exterior grade plywood, OSB, and metal surfaces.
Surfaces to receive the flashing membrane must be dry, clean, smooth, firm, free of release agents, curing compounds, dust, loose mortar, wire, fins, projections, or other substances that prevent proper installation and application of the self-adhered membrane.
For compatibility inquiries or concerns please reach out to York Flashings at
1) Protection from Water During Construction – Protect tops of walls, window openings, penetrations, and incomplete transitions from water intrusion before, during, and after installation. Do not install membrane where concealed moisture may compromise adhesion from the back side of the flashing.
2) Exterior Sheathing – Exterior sheathing shall be installed in accordance with the sheathing manufacturer’s written instructions. Sheathing shall be sound, properly anchored, and free of damaged board edges, excessive deflection, misdriven fasteners, protruding fasteners, or improperly seated fasteners.
3) CMU Substrates – CMU substrates shall be free of voids or fins, and the mortar joints should be filled and struck flush. Mortar must be cured a minimum of 7 days prior to installation of the membrane.
4) Concrete Substrates – Concrete substrates must be clean and free of release agents, curing compounds, laitance, fins, projections, loose material, and other contaminants. Voids shall be patched with mortar, non-shrink grout, or other approved patching materials prior to installation.
5) Metal Surfaces – Metal surfaces need to be cleaned and free of oils or other contaminants. York recommends a pull-test be conducted to validate proper adhesion and performance on structural members which have been factory primed, painted, coated, or treated.
Note: Metal surfaces are subject to application surfaces temperature limitations during installation.
6) Inside corners, cants, and 90-Degree Transitions – 90° angles and cant joints shall be treated with a minimum ¾-inch by ¾-inch cant bead of York US-100, tooled in a chamfer to support the membrane when it is being rolled. This prevents bridging and promotes proper bonding of the membrane when it is rolled at laps. It also provides protection from incidental moisture reaching the back of the membrane during the construction phase.
7) Fasteners and Extrusions – Fasteners must be flush with the surface of the substrate. If fasteners are sharp or protrude from the substrate, they should be detailed with York US-100. This is recommended to prevent the membrane from being damaged when the membrane is rolled as part of the installation process.
8) Unsupported Laps and Bridging – York 304 SA / York 316 SA is capable of bridging limited unsupported conditions; however, all laps, joints, and cants that require rolling shall be properly supported during installation. Where laps are unsupported, the installer shall provide temporary backing or another York-approved method to allow firm rolling pressure to be applied across the lap. Unsupported laps shall not be left unrolled or partially bonded. Consult www.yorkflashings.com for drawings and technical bulletins showing how to detail and properly roll the membrane in such conditions.
GENERAL PRODUCT INSTALLATION:
1) Cut the product in lengths to be manageable and workable.
2) Remove the siliconized release liner prior to installing the product onto the substrate.
3) Membrane shall be installed in a relaxed, neutral condition. Do not stretch, tension, pull, or force the membrane during installation. Installing the membrane under tension may contribute to edge lift, or curling as the stainless steel facer expands or contracts.
4) York 304 SA / York 316 SA is a considered a primerless membrane under most conditions; however, compatibility should always be reviewed to identify if a primer is required for encapsulation of incompatible construction products. For materials requiring review, and/or epoxy primer requirements, see “Compatibility and Primer Requirements”, or reach out to York Flashings’ Technical Team at
5) York 304 SA / York 316 SA can be applied horizontally or vertically. Laps in vertical and horizontal applications should be evaluated and installed as follows:
a) For standard above-grade through-wall flashing and transition membrane applications where hydrostatic pressure is not anticipated, splice adjoining membrane sections with a minimum 2-inch overlap. Install laps in shingle fashion where water-shedding direction applies.
b) For below-grade applications, waterproofing transitions, or any condition where hydrostatic pressure is anticipated, splice adjoining membrane sections with a minimum 4-inch overlap. In addition, install a minimum 8-inch-wide York-approved counter-lap splice strip centered over the exposed edge of the upper lap. The counter-lap splice strip shall extend a minimum of 4 inches onto each side of the lap joint.
i) For purposes of these instructions, hydrostatic conditions include below-grade waterproofing transitions, foundation-to-wall transitions, plaza or planter conditions, retaining wall conditions, areas subject to ponding water, locations where water head may develop, transitions to waterproofing or damp-proofing systems, or any condition where the membrane lap may be exposed to sustained water pressure rather than incidental drainage-plane water exposure.
ii) Where there is uncertainty whether hydrostatic pressure is anticipated, the condition shall be treated as hydrostatic unless otherwise reviewed by York Flashings Technical Team. Please consult www.yorkflashings.com for drawings and technical bulletins showing how to properly install an enhanced lap for below grade applications or conditions subject to potential hydrostatic pressure.
6) All laps, counter-lap splice strips, terminations, and patches shall be hard rolled with constant, firm pressure to ensure uniform contact with the substrate and adjoining membrane. Where laps are unsupported, the installation contractor shall provide temporary backing or pre-roll the lap as required to achieve full contact. Note: York 304 SA / York 316 SA MUST be hard rolled as part of the installation of the product. Omitting rolling could affect the performance of the product and/or result in premature failure and delamination of the product from the substrate. Brooming, hand pressure, or smoothing by hand is not acceptable as a substitute for rolling.
7) Edge seal all exposed leading edges, reverse laps, vertical terminations, horizontal terminations not protected by shingle lap, below-grade transitions, penetrations, cuts, patches, and transitions to dissimilar materials, as detailed and recommended, immediately following the installation and rolling of the membrane. All required edge sealant shall be installed the same day the membrane is installed. Do not leave exposed leading edges, vertical terminations, reverse laps, patches, or hydrostatic-condition laps unsealed overnight. Edge sealants shall be installed at a minimum thickness of 30 wet mil. A properly installed edge sealant shall have a minimum of ½ inch bite onto both the stainless steel facer, and the substrate or drip edge. Please consult www.yorkflashings.com for drawings showing when and what conditions require edge sealant for best practices and performance. At hydrostatic-pressure conditions, all lap edges, counter-lap splice strip edges, terminations, cuts, penetrations, and leading edges shall be sealed with York US-100 or York-approved edge sealant at a minimum thickness of 60 wet mils. Edge sealant shall have a minimum 1/2-inch bite onto both the stainless steel facer and the adjacent substrate, membrane, drip edge, or approved accessory.

8) When installing York 304 SA / York 316 SA flashing/transition membrane over an air barrier, sealants, coatings, or below grade waterproofing, the already installed product must be fully cured, clean, and dry.
9) At 90-degree angles, inside corners, and cant joints, provide a minimum 3/4-inch by 3/4-inch cant bead of York US-100, tooled into a chamfer, to support the membrane and reduce bridging. Alternatively, where approved, pre-bend the membrane and roll the crease before removing the release liner and installing the membrane.
Note: The purpose of the cant bead is to support the membrane during rolling, promote proper contact at the transition, reduce the risk of bridging, and help limit incidental moisture migration behind the membrane during construction.
10) For next day installation of the subsequent flashing layer, the installing contractor shall clean the surface of the stainless steel facer with denatured alcohol to receive the subsequent flashing membrane.
SUMMER AND HIGH HEAT INSTALLATION:
In high-heat conditions, store York 304 SA / York 316 SA in a shaded, clean, dry, ventilated location. Do not store rolls in direct sunlight, on exposed roof decks, on hot pavement, in unventilated trailers, in closed vehicles, or in metal storage containers where temperatures may exceed 100°F.
Rolls shall be maintained at a temperature below 100°F prior to installation. Do not install membrane rolls that are excessively hot, softened, distorted, telescoped, blocked, curled, or otherwise deformed.
Where substrate temperatures exceed 100°F, the installer shall take precautions to reduce the risk of adhesive creep, edge curling, and facer movement. Precautions may include installing during cooler portions of the day, using shorter manageable lengths, immediately rolling the membrane, and sealing leading edges the same day of installation. Note: Longer continuous runs may be more susceptible to thermal movement, handling stress, and edge lift, particularly in high heat or direct sunlight.
Do not install York 304 SA / York 316 SA onto substrates with surface temperatures exceeding 170°F.
Where substrate temperatures exceed 120°F, or where the membrane will be exposed to high solar loading after installation, York recommends performing field adhesion testing and consulting York Flashings Technical Team for project-specific guidance.
WINTER AND COLD WEATHER INSTALLATION:
In cold weather, York 304 SA / York 316 SA shall be stored in a clean, dry, protected location and conditioned at a minimum temperature of 50°F for at least 24 hours prior to installation.
Only the amount of material that can be installed during the work period should be removed from conditioned storage. Rolls shall be kept warm and dry until immediately prior to use.
Do not install York 304 SA / York 316 SA onto frost-covered, damp, wet, icy, or contaminated substrates. Substrate temperature shall be verified at the surface immediately prior to installation.
When substrate temperatures are between 20°F and 40°F, additional precautions are required. These may include warming the material, confirming adhesion by field pull test, installing shorter manageable lengths, immediately rolling all membrane surfaces and laps, re-rolling laps and edges before the end of the work period, and sealing terminations the same day.
Do not use open flame or uncontrolled heat sources to warm the membrane, adhesive, substrate, or installed flashing. If temporary heat is used, provide indirect heat and verify that the substrate remains dry and within the approved application temperature range.
COMPATIBILITY AND PRIMER REQUIREMENTS:
York 304 SA / York 316 SA is a primerless membrane under typical approved substrate conditions. However, primer or additional compatibility measures may be required where substrate conditions, project specifications, adjacent materials, or long-term exposure conditions warrant additional preparation.
1) Materials Requiring Review – Do not install York 304 SA / York 316 SA directly onto the following materials unless reviewed and approved by York Flashings Technical Team:
a) Silicone fluid-applied membranes.
b) Silicone sealants.
c) PMMA waterproofing membranes.
d) Petroleum-based waterproofing.
e) Asphalt-based waterproofing.
f) Asphalt or petroleum mastics in encapsulated conditions.
g) Factory-primed or coated steel where adhesion has not been confirmed.
h) Materials containing plasticizers or surface treatments that may impair adhesion.
2) Epoxy Primer Requirement:
a) York requires the use of an epoxy primer when York 304 SA / York 316 SA transitions directly onto petroleum-based or asphalt-based fluid-applied waterproofing or damp-proofing membranes, and PMMA membranes.
b) The epoxy primer shall be compatible with the adjacent waterproofing membrane and shall be applied in accordance with the primer manufacturer’s written instructions prior to installation of York 304 SA / York 316 SA.
APPLICATIONS AND PROJECT DETAILS
York 304 SA / York 316 SA is used in multiple building-envelope applications, including through-wall flashing, transition membrane, below-grade waterproofing transitions, rough opening flashing, sill pan flashing, parapet and top-of-wall flashing, roof-to-wall transitions, air-barrier transitions, drip-edge conditions, end dams, inside and outside corners, and termination-bar conditions.
The general installation requirements in this document apply to all York 304 SA / York 316 SA applications unless specifically modified by York Flashings’ published details or written project-specific guidance from York Flashings Technical Team.
Application-specific details, including but not limited to transition membranes, below-grade transitions, curtain wall and storefront openings, sill pans, parapets, through-wall flashing, drip edges, termination bars, end dams, inside corners, and outside corners, shall be installed in accordance with York Flashings’ published details available at www.yorkflashings.com.
Before installation, the installer shall review the applicable York Flashings published details, project construction documents, adjacent manufacturer instructions, and sequencing requirements.
Where project conditions differ from York Flashings’ published details, or where dissimilar materials, hydrostatic pressure, unsupported laps, unusual substrates, high heat, cold weather, incompatible materials, or non-standard sequencing are present, contact York Flashings Technical Team for project-specific guidance before installation.
Do not rely on general installation instructions alone where a project-specific detail is required to maintain continuity of the air barrier, water-resistive barrier, flashing, waterproofing, roofing, or fenestration system.
APPLICATION-SPECIFIC REQUIREMENTS
1) Transition Membrane Between Dissimilar Materials
Maintain water-shedding continuity and avoid reverse laps. Materials transitioned onto the stainless steel facer shall lap a minimum of 2 inches unless greater laps are required by York Flashings’ published details or project conditions. Verify compatibility before installing York 304 SA / York 316 SA onto previously installed membranes, coatings, sealants, or waterproofing materials.
2) Below-Grade Waterproofing Transitions
Below-grade transitions and conditions where hydrostatic pressure is anticipated shall use enhanced lap and edge-sealant requirements. The transition membrane shall lap onto below-grade waterproofing a minimum of 4 inches unless otherwise shown in York Flashings’ published details. Primer or other compatibility measures may be required for asphalt-based, petroleum-based, PMMA, or other fluid-applied waterproofing systems.
3) Rough Openings, Curtain Wall, and Storefront Flashing
Install flashing in shingle fashion from the lowest point upward. Sill flashing shall be installed before jamb flashing, and head flashing shall be installed last. Reinforce corners as required by York Flashings’ published details. Roll each membrane piece before installing subsequent pieces.
4) Sill Pan Flashing
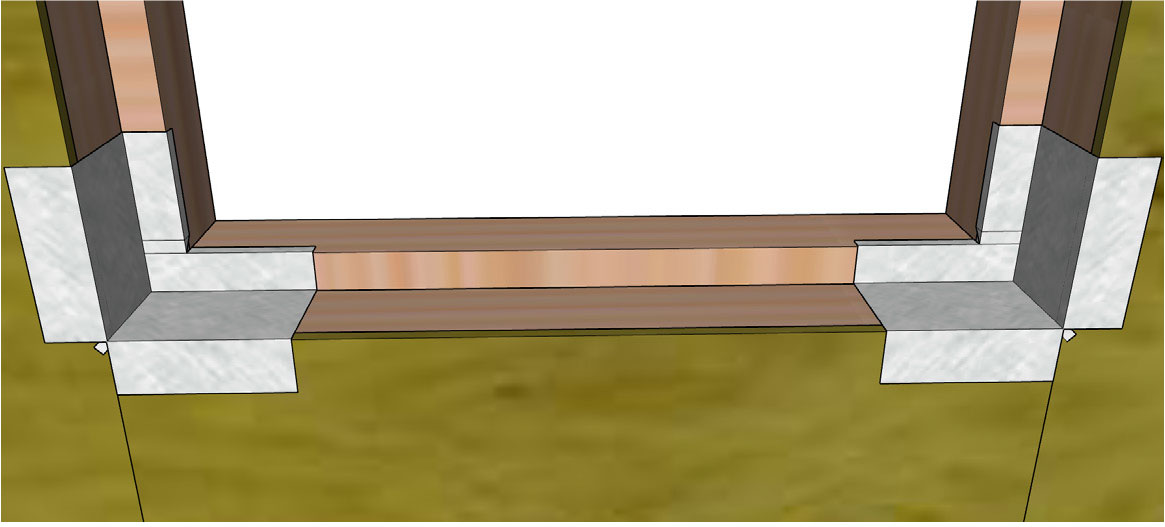
Sill pan flashing shall be configured to direct incidental water to the exterior and shall include end dams, back dam or positive slope, corner reinforcement, and integration with the adjacent air barrier or water-resistive barrier as shown in York Flashings’ published details.
5) Parapet and Top-of-Wall Flashing
Select membrane width to fully cover the top of wall or parapet condition and to provide required laps onto adjacent vertical surfaces. Maintain compatibility and continuity with air barriers, roofing membranes, and coping or parapet accessories.
6) Through-Wall Flashing
Install through-wall flashing to maintain drainage to the exterior. Provide end dams, inside and outside corners, drip edge, termination bar, fasteners, and sealant as required by York Flashings’ published details and project construction documents.
INSPECTION, CORRECTION, AND INSTALLATION DEFICIENCIES:
Inspect the installation of the flashing, and repair any deficiencies, and/or any compromised or damaged areas observed. Where edge lift, curling, fish-mouths, wrinkles, bridging, or loss of adhesion is observed, the affected area shall be repaired according to the following written instructions before the membrane is concealed by masonry, cladding, insulation, backfill, overburden, or adjacent construction.
1) Patch damaged areas with a minimum 4”x4” piece of York 304/316 SA to serve as a splice tape. The splice tape shall extend a minimum of 2” beyond the damaged area or hole/puncture. Cut and install the tape over the damaged area, roll the splice tape with full body pressure, and apply York US-100 edge sealant to all edges per the manufacturer’s installation instructions.
2) For wrinkles, attempt to roll the membrane to remove/flatten the membrane. Some small wrinkles, once rolled, are acceptable and will not compromise the performance of the membrane, as long as the wrinkle is in the field of the membrane and not located at a lap or at the leading edge of the flashing which is bonded onto a drip edge or onto a horizontal water ledge, or onto a brick ledge.
3) For fishmouths (large wrinkles which could allow water to get under the flashing), which cannot be rolled out, cut the membrane to allow the stainless steel membrane to lay flat and properly bonded onto the substrate once rolled. Then patch the membrane with a piece of splice tape as described above, and seal with edge sealant.
4) For dogeared corners, cut the excess corner, and provide edge sealant as required to ensure a sound termination of the membrane. To prevent dogears, do not bend the corners of the membrane excessively during removal of the release liner. Ensure the membrane is handled with clean fingers/gloves and prevent excessive handling of the butyl adhesive after the release liner is removed, as oils and dirt from the installer’s fingers could potentially compromise the adhesion properties of the rubber butyl adhesive.
5) For laps that are not bonding, remove any loose or poorly bonded membrane, clean the surface from adhesive residuals, and install a new flashing membrane. Ensure the stainless steel facer is not soiled or contaminated prior to the installation of the subsequent layer. For next day installation of the subsequent flashing layer, the installing contractor shall clean the surface of the stainless steel facer with denatured alcohol to receive the subsequent flashing membrane. Clean the stainless steel facer by using a lint-free, clean cloth soaked in undiluted denatured alcohol to wipe down the surface or substrate. Allow the alcohol to flash off and fully evaporate prior to installation of the patch, new flashing, or subsequent layer of flashing.
For additional support, reach out to York Flashings’ Technical Team at
QUALITY ASSURANCE / FIELD TESTING:
York Flashings recommends the quality assurance and field testing protocols listed herein as best-practice measures to help verify substrate suitability and installation quality. These protocols are provided as recommendations only and are not required or mandated by York Flashings unless specifically included as a project requirement by the design professional, owner, or contract documents.
1) Install a project mockup at representative substrates, transitions, corners, laps, penetrations, and terminations prior to production installation.
2) Perform adhesion pull tests on each representative substrate and on factory-primed, painted, coated, or treated surfaces prior to installation. Installation shall not proceed until acceptable adhesion has been confirmed.
3) Installer shall inspect substrate conditions prior to installation and notify the general contractor/design professional of unsuitable conditions.
4) Installed membrane shall be inspected daily for fish-mouths, wrinkles, voids, bridging, unrolled laps, damaged areas, incomplete edge sealant, reverse laps, and discontinuities.
5) Deficiencies shall be repaired in accordance with York Flashings’ written repair instructions before cladding, masonry, insulation, or overburden conceals the work.
York 304 SA
How to Fold a Sill Pan
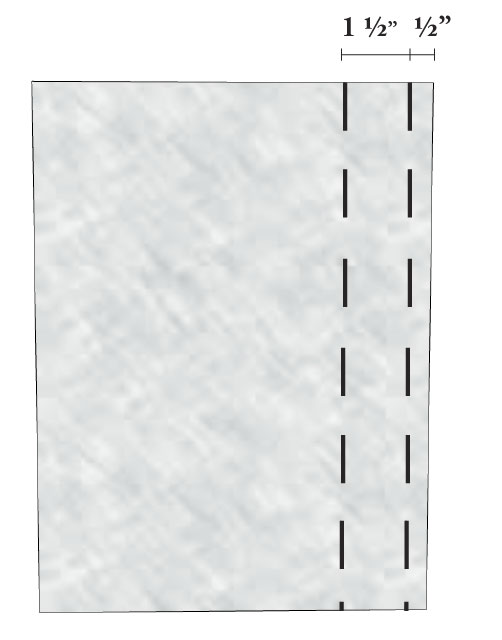
Fold the York 304 SA at the dotted lines
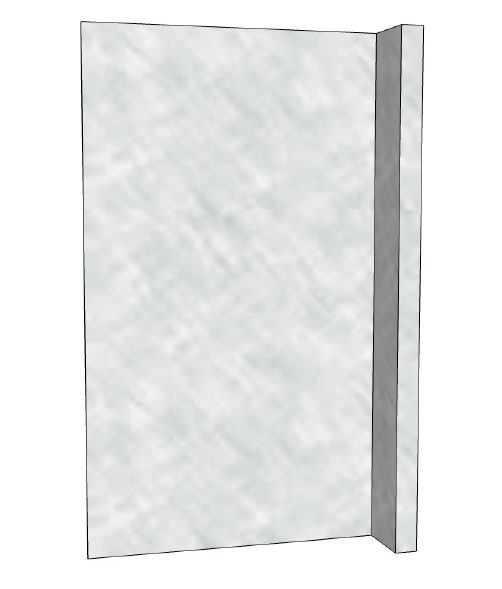
After creasing, lay the York 304 SA flat
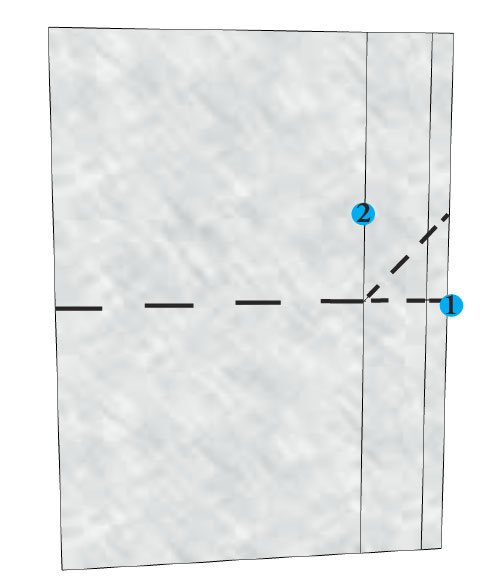
Pull point 1 to point 2, while creasing on the diagonal dotted line
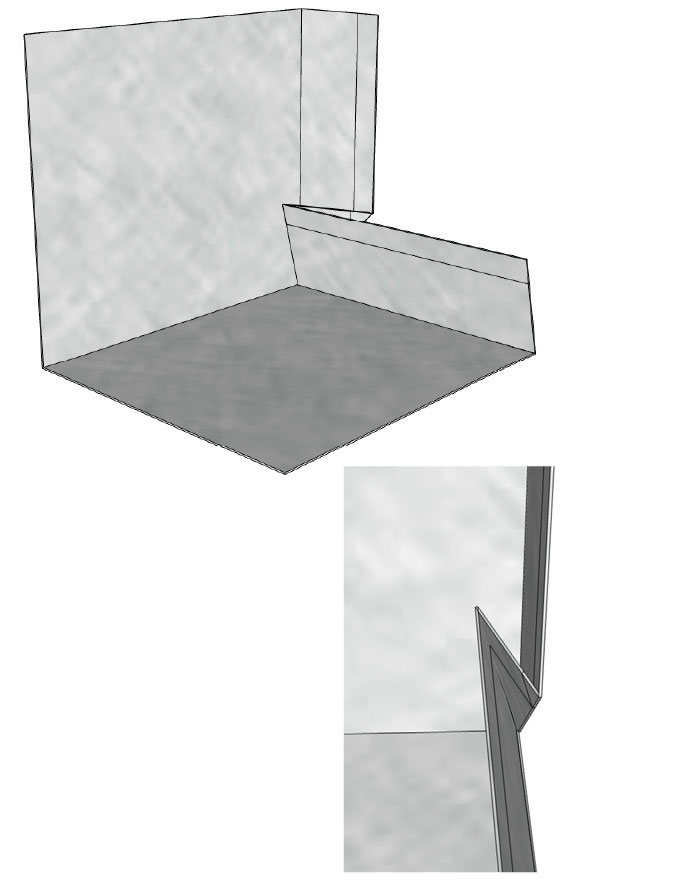
Remove the release liner in the highlighted area and firmly press all creases together
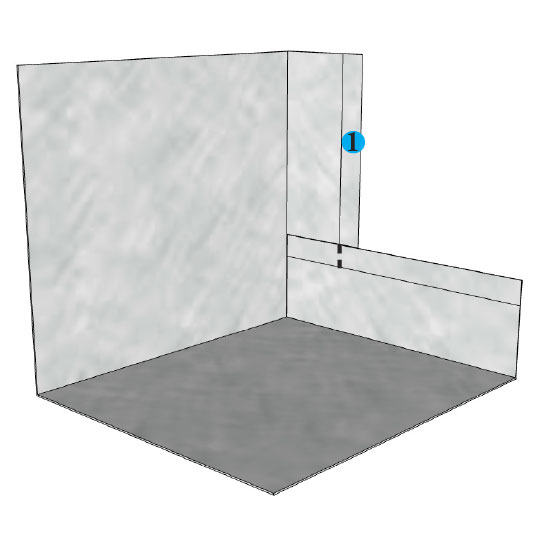
Cut at the dotted line and fold edges back
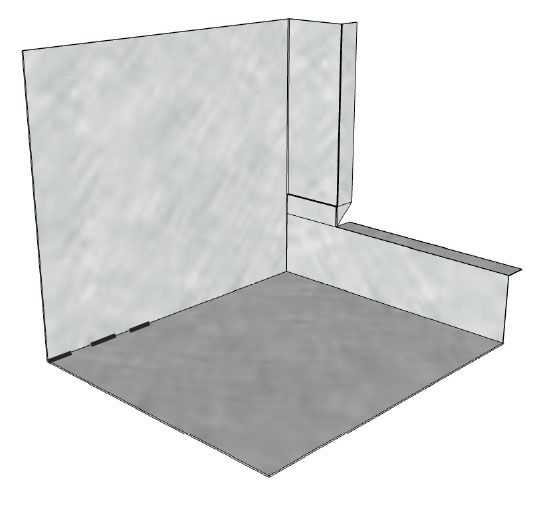
Make corners for both the left and right side of the rough opening
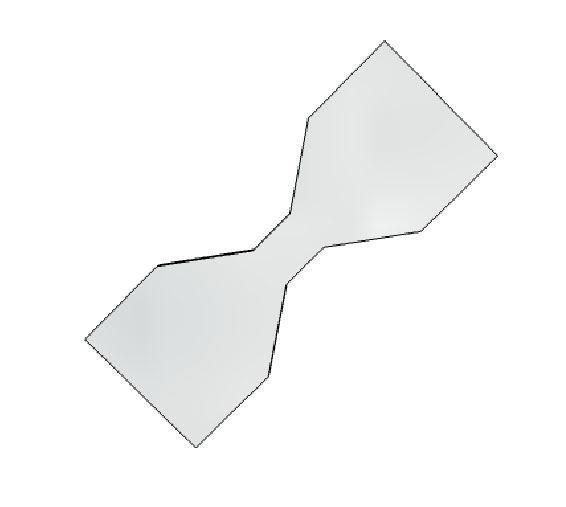
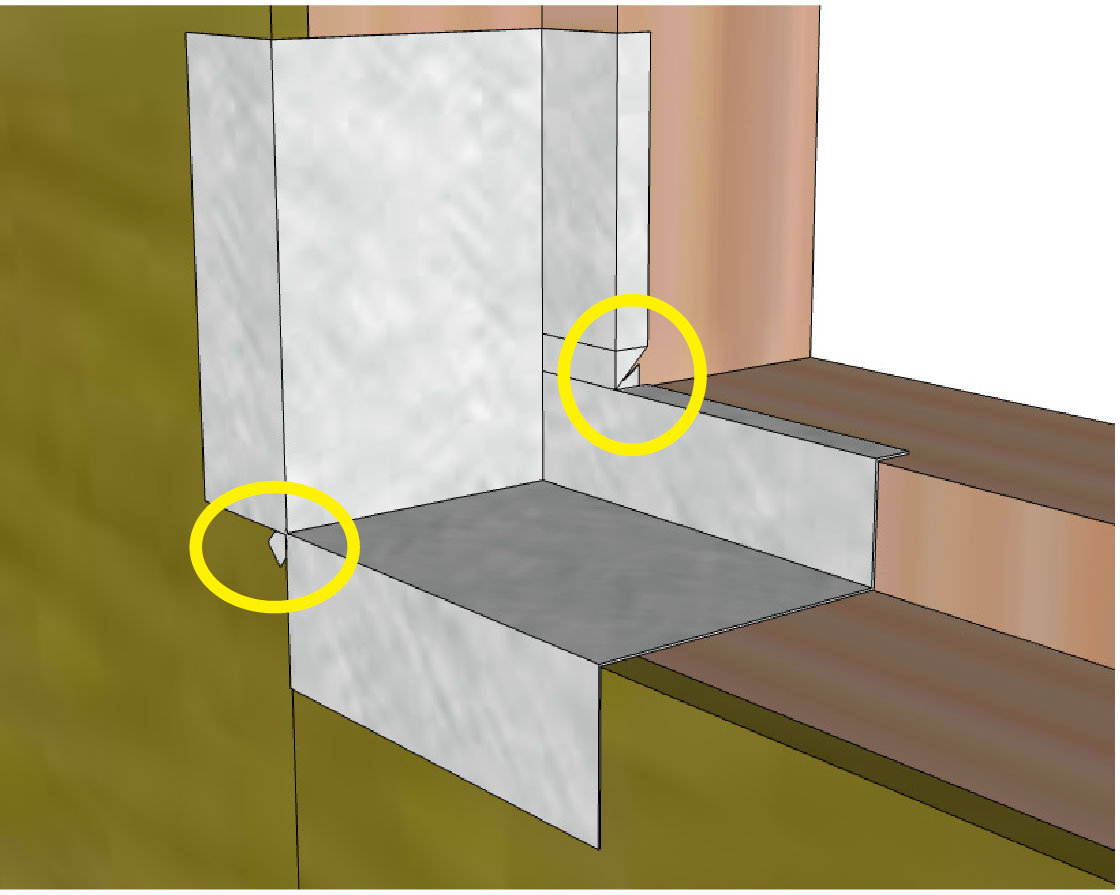
Required: Cut a dovetail piece to detail the pinhole location
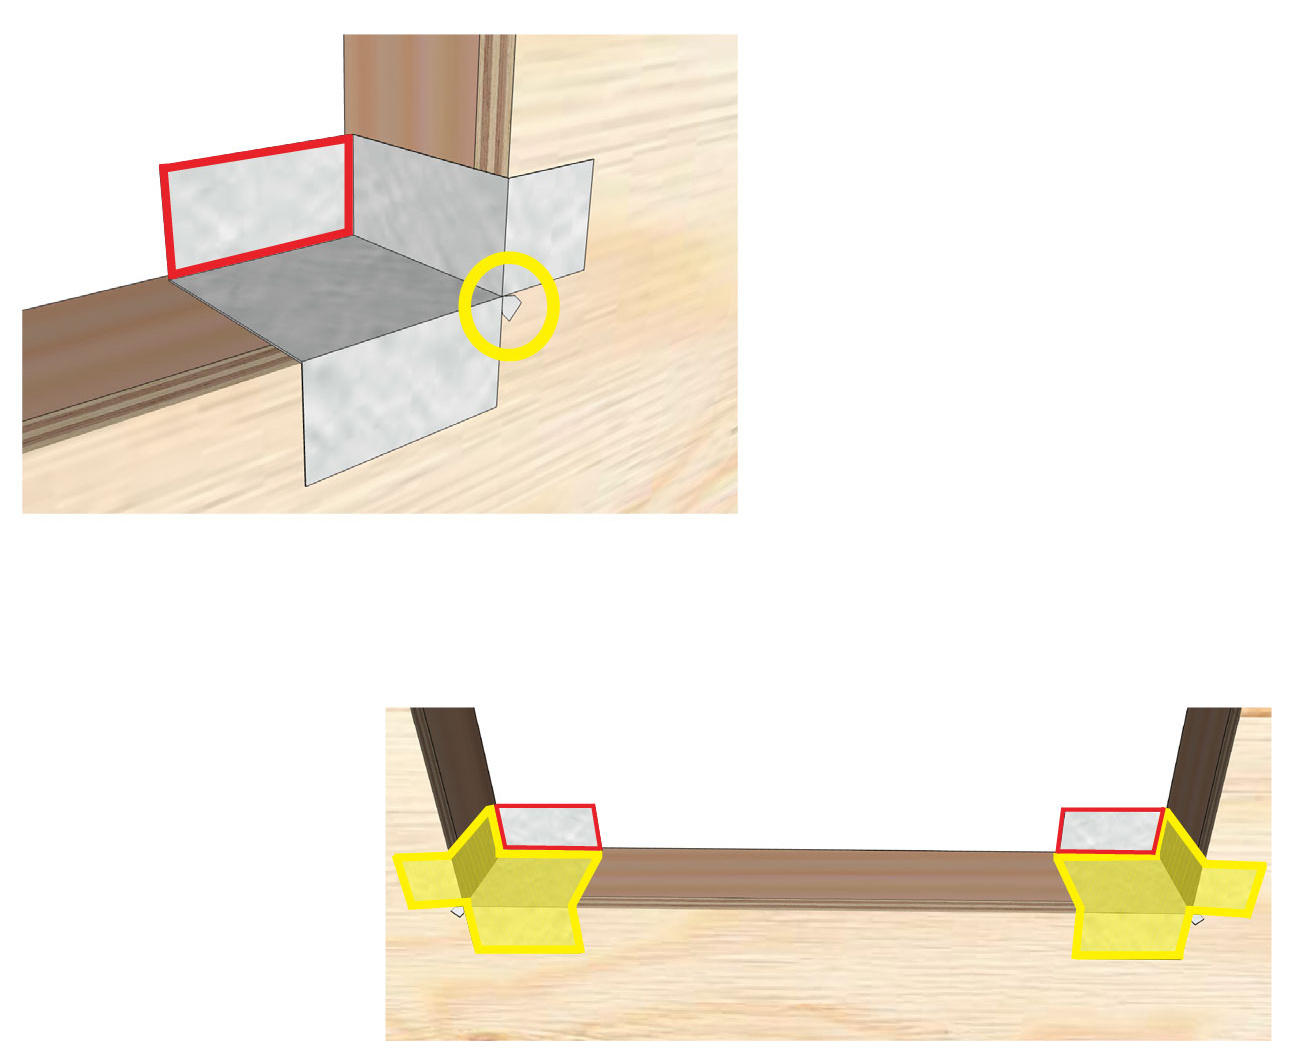
Install the dovetail piece in the corner before the end dam. Remove the release liner from the backside of the yellow highlighted area (do not remove the release liner from the red outlined area) and install the corners.
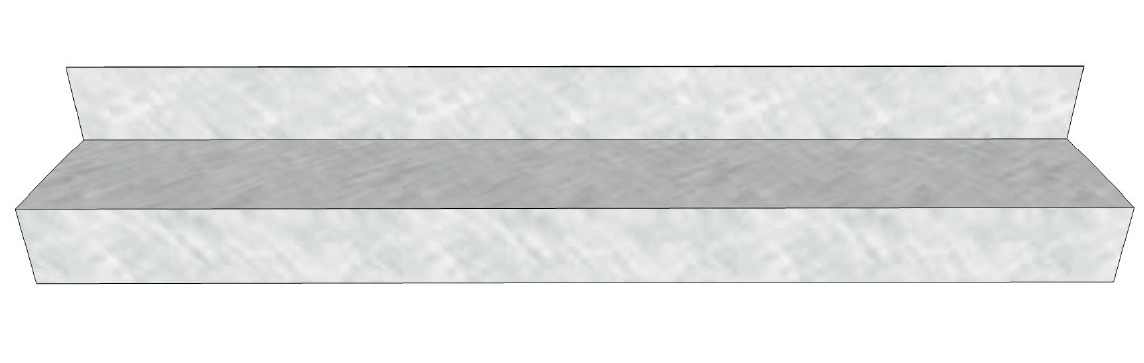
Cut the center piece and fold the back dam to match the corners
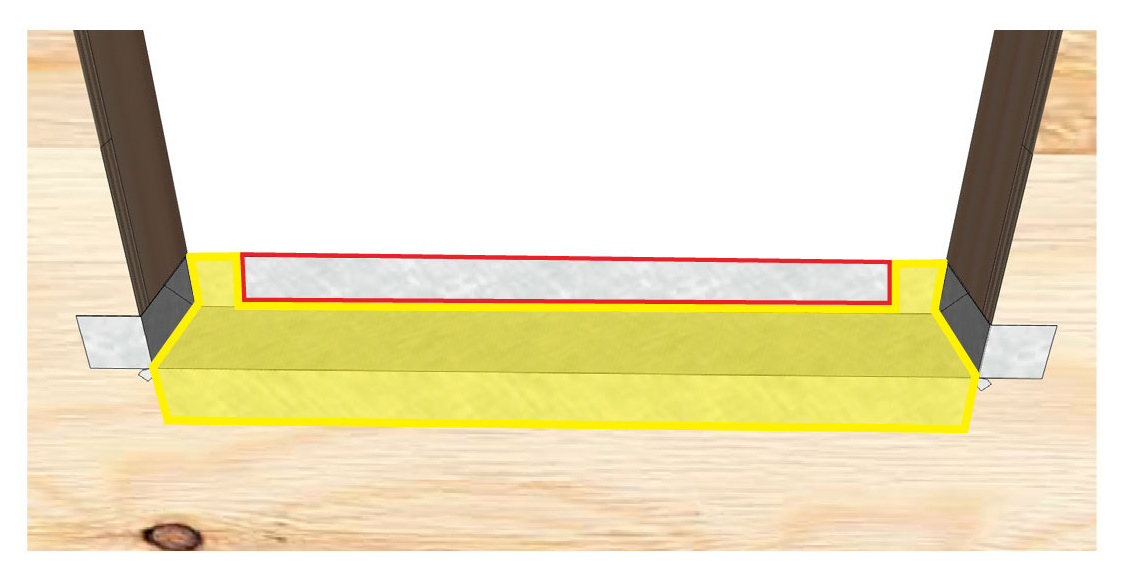
Remove the release liner from the backside of the yellow highlighted area (do not remove the release liner from the red outlined area) and install the center piece on the sill
Required: Install the membrane using a hard roller and roll the membrane with constant, firm pressure to ensure uniform contact with the substrate.
York 304 SA
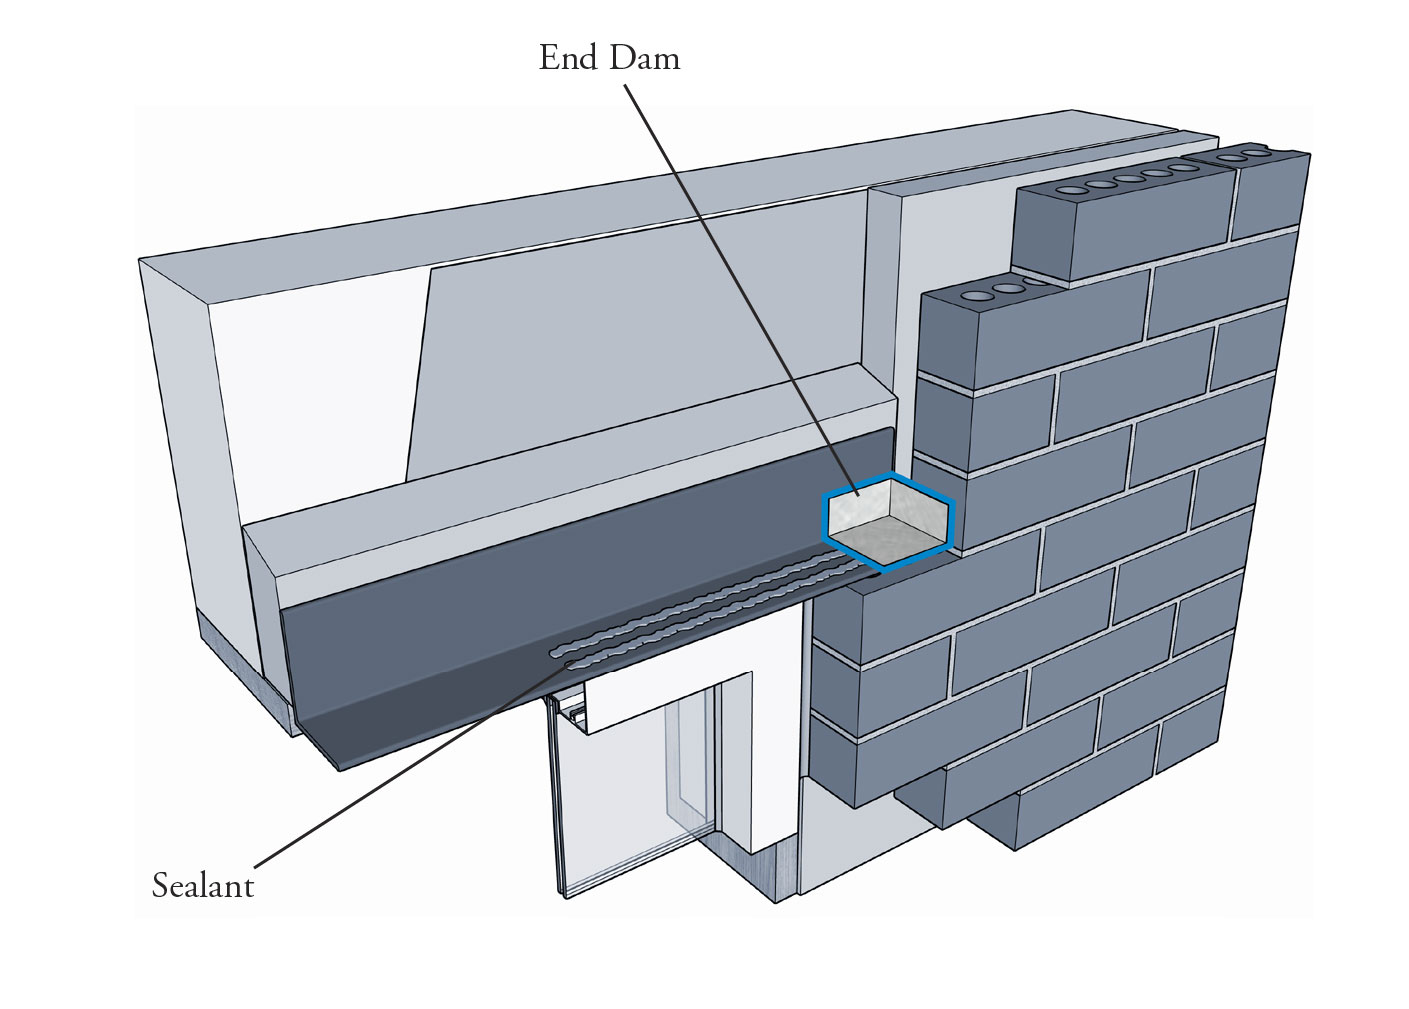
How to Fold an End Dam
 1. Fold the York 304 SA at the dotted lines
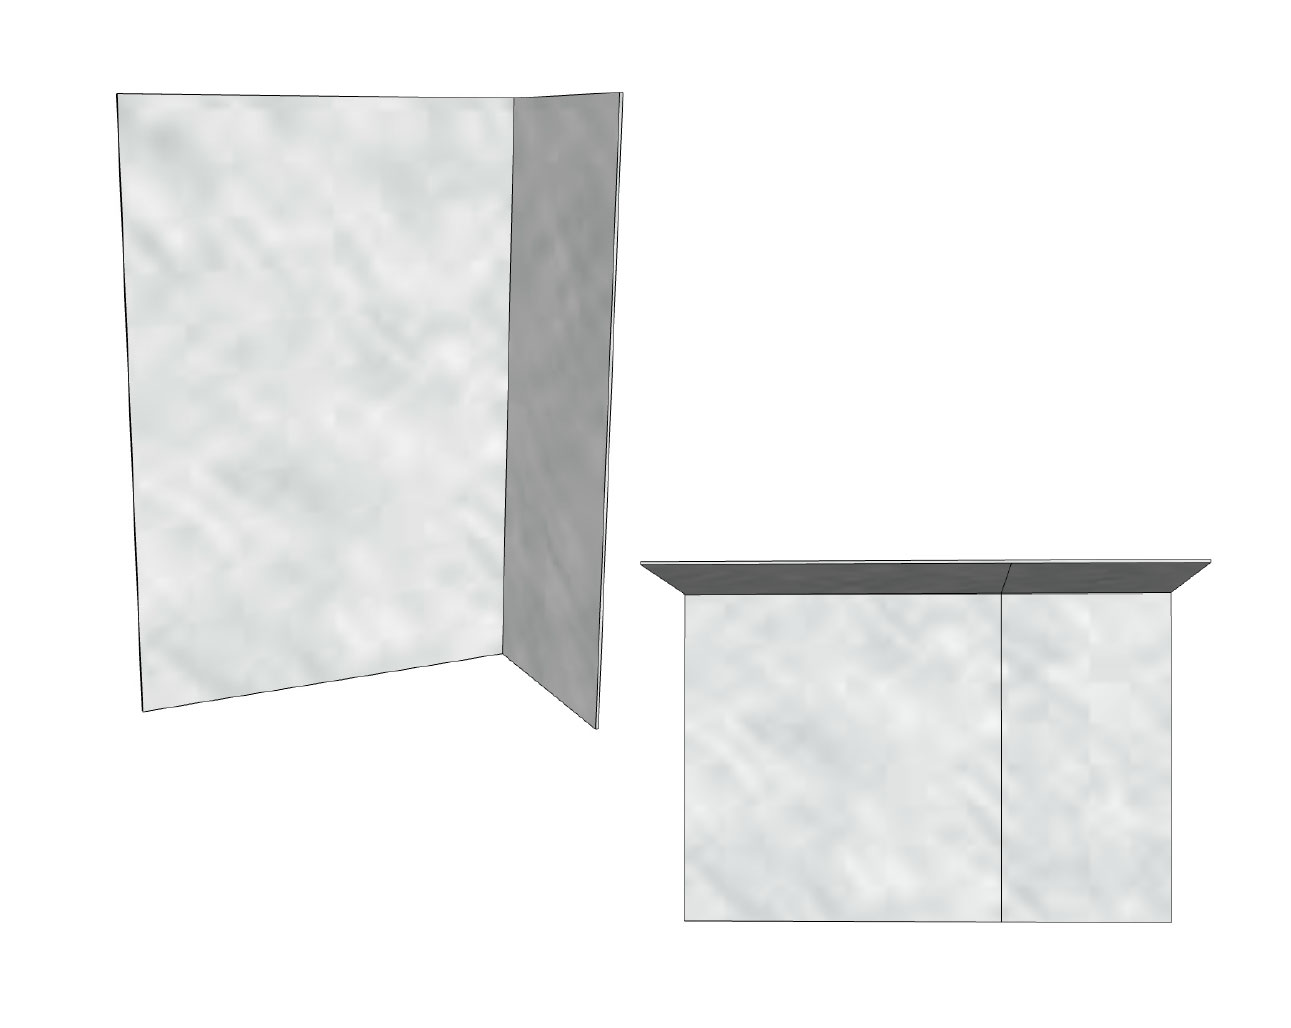
2. After creasing, lay the York 304 SA flat
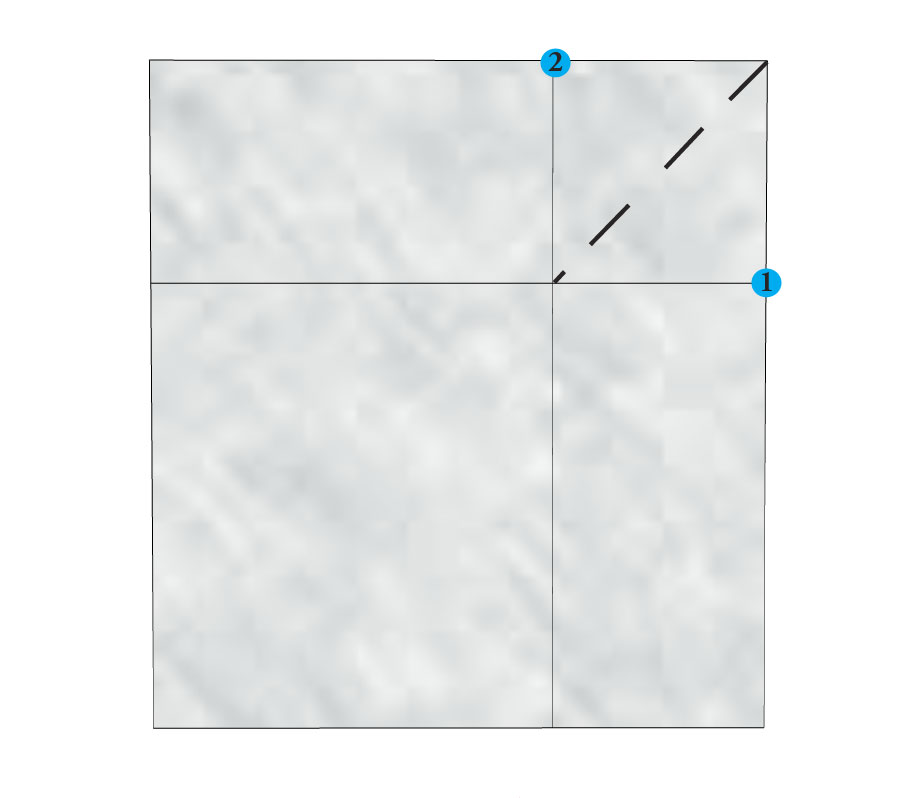
3. Pull point 1 to point 2, while creasing on the diagonal dotted line
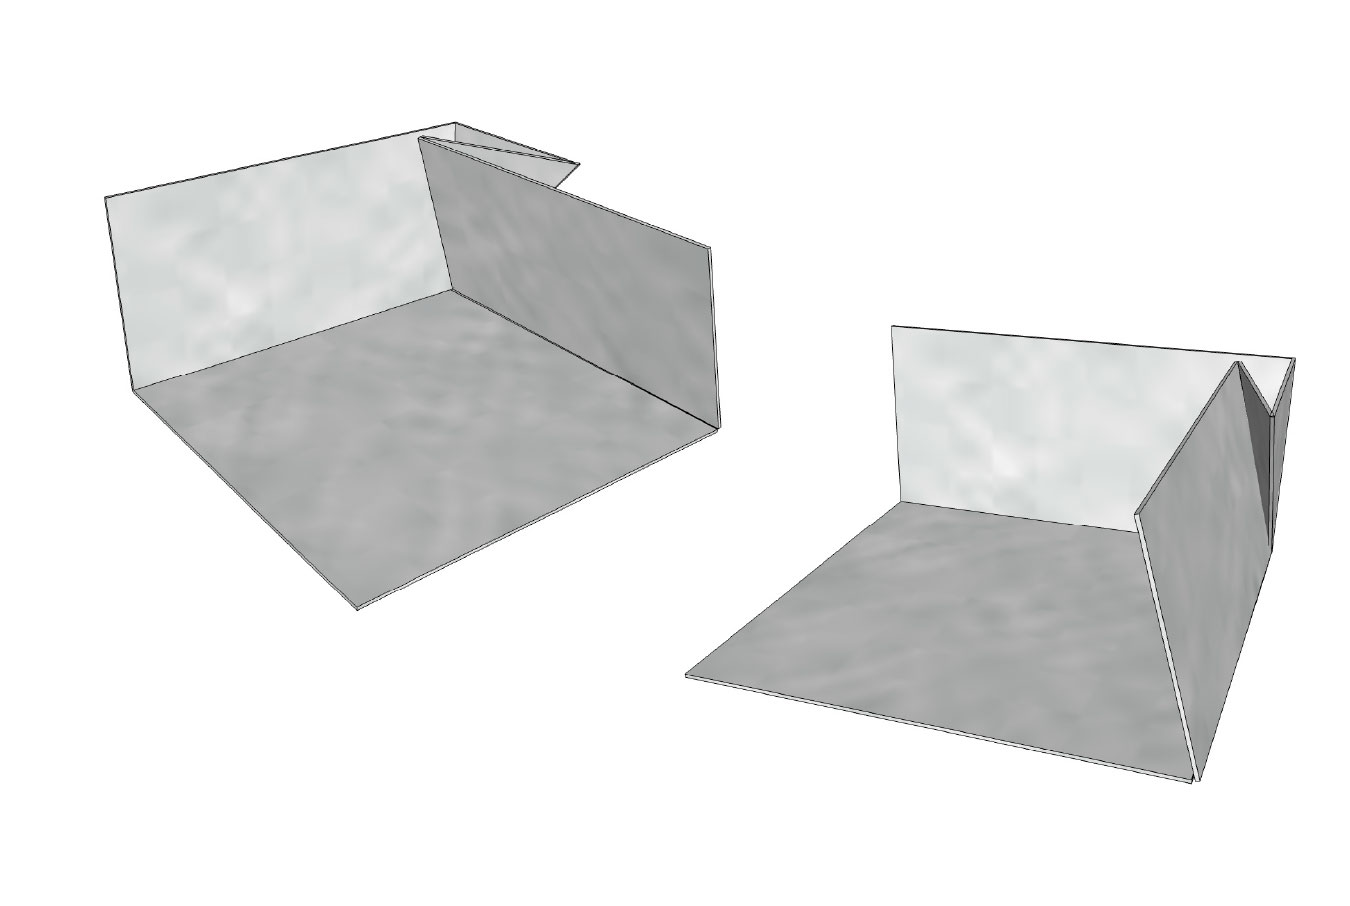
4. Firmly press all creases together
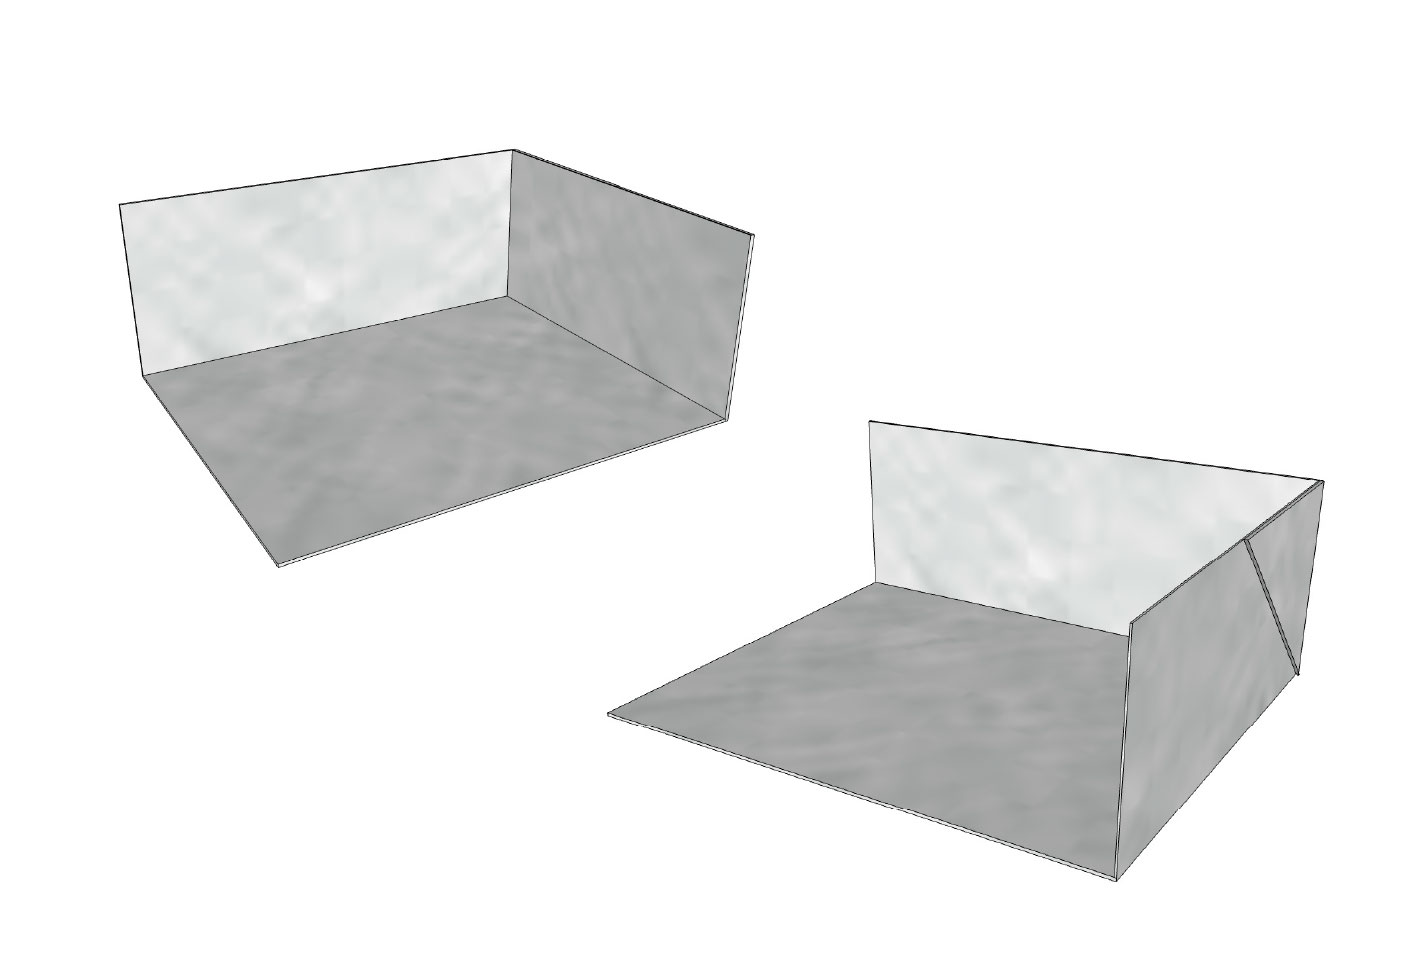
5. Your end dam is now ready to install
York 304 SA
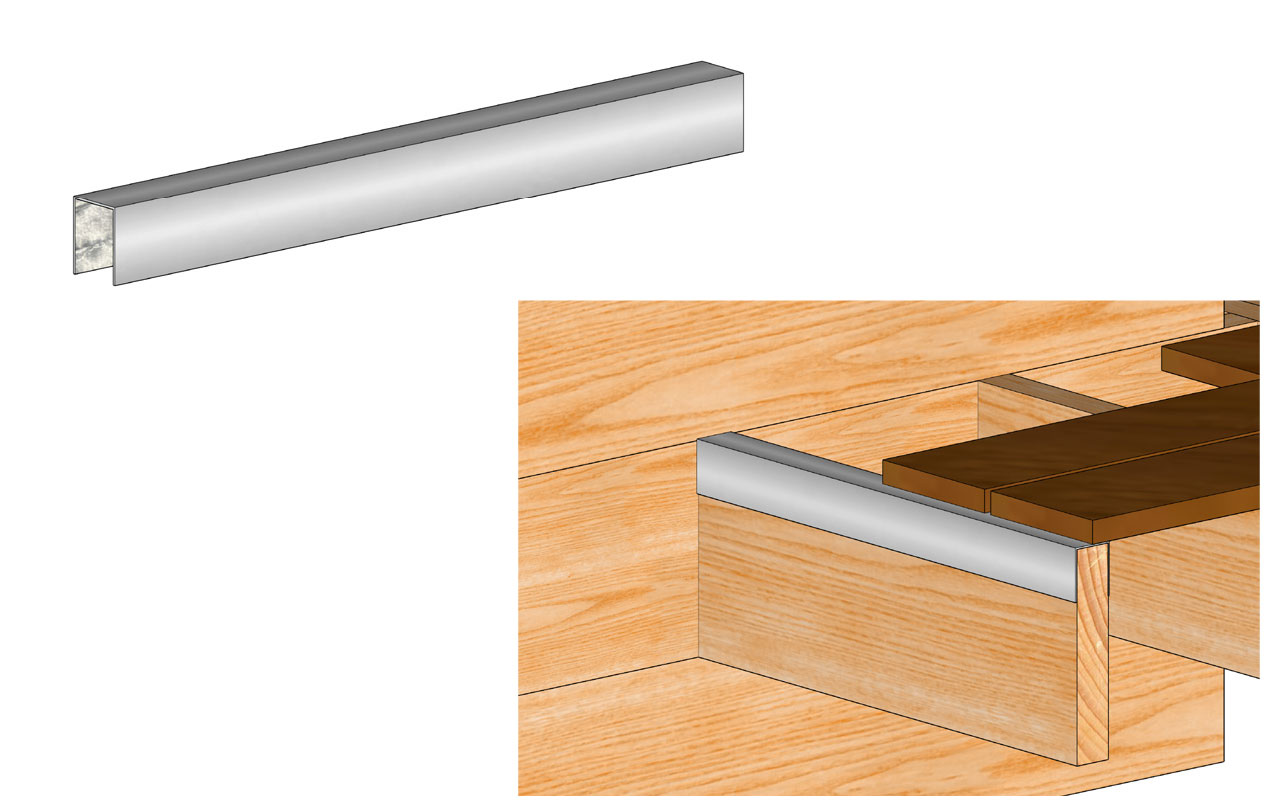
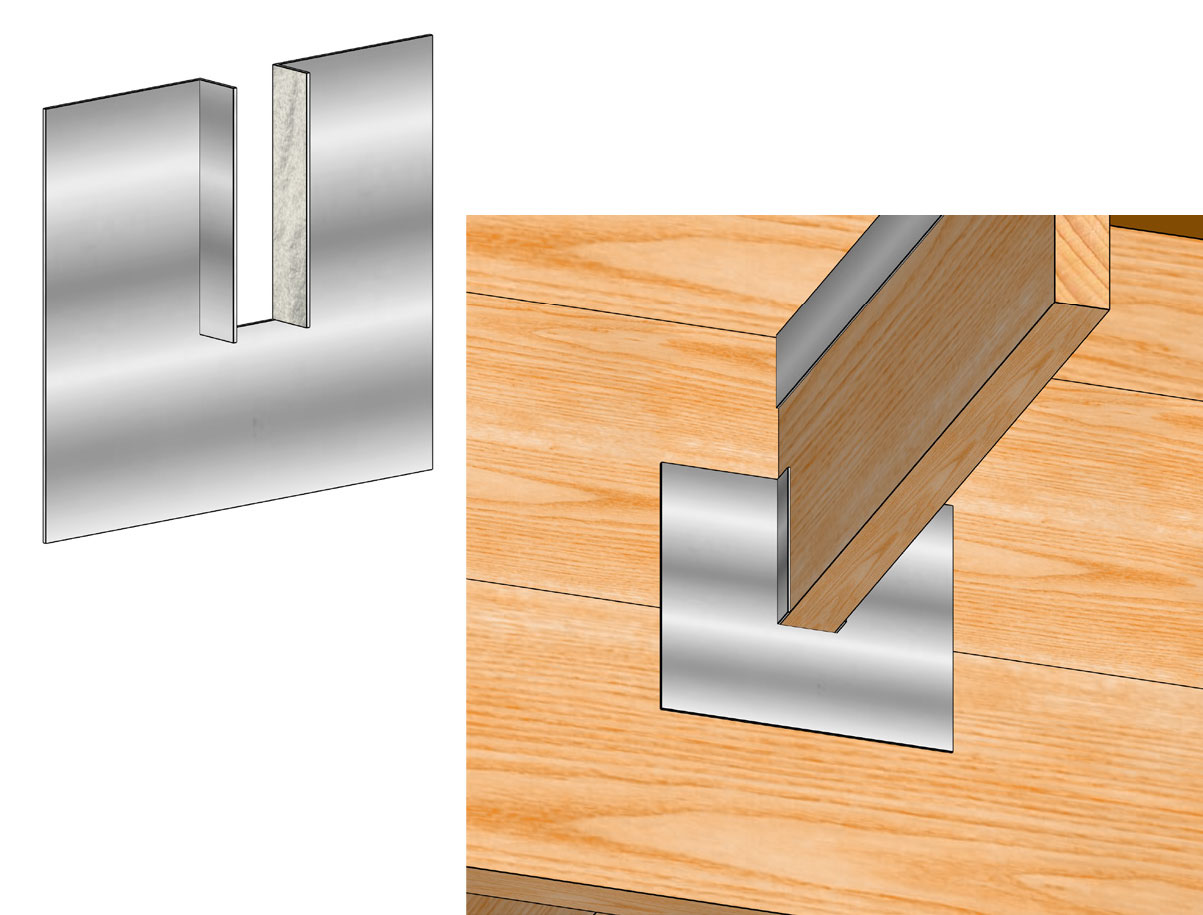
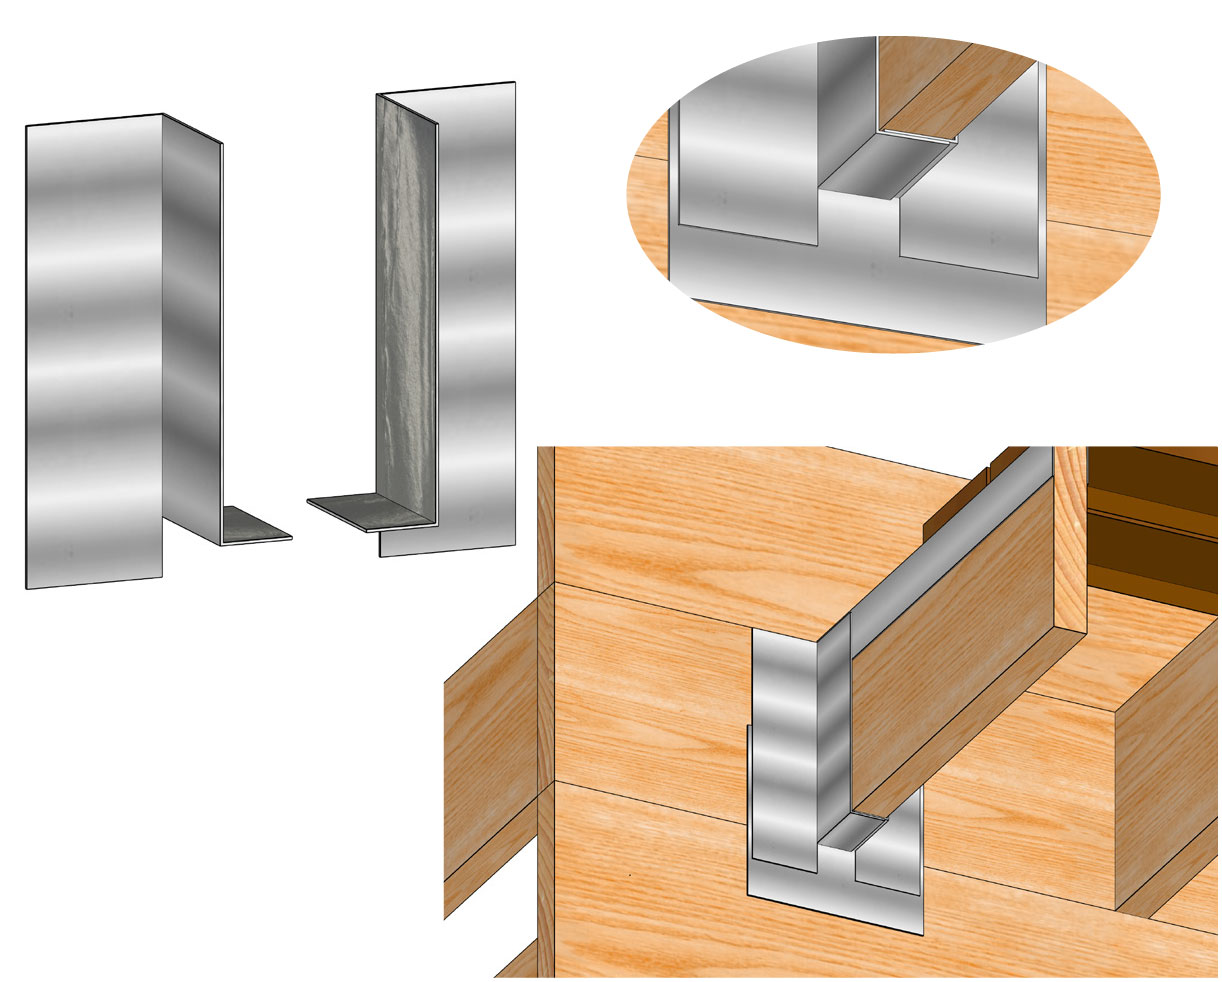
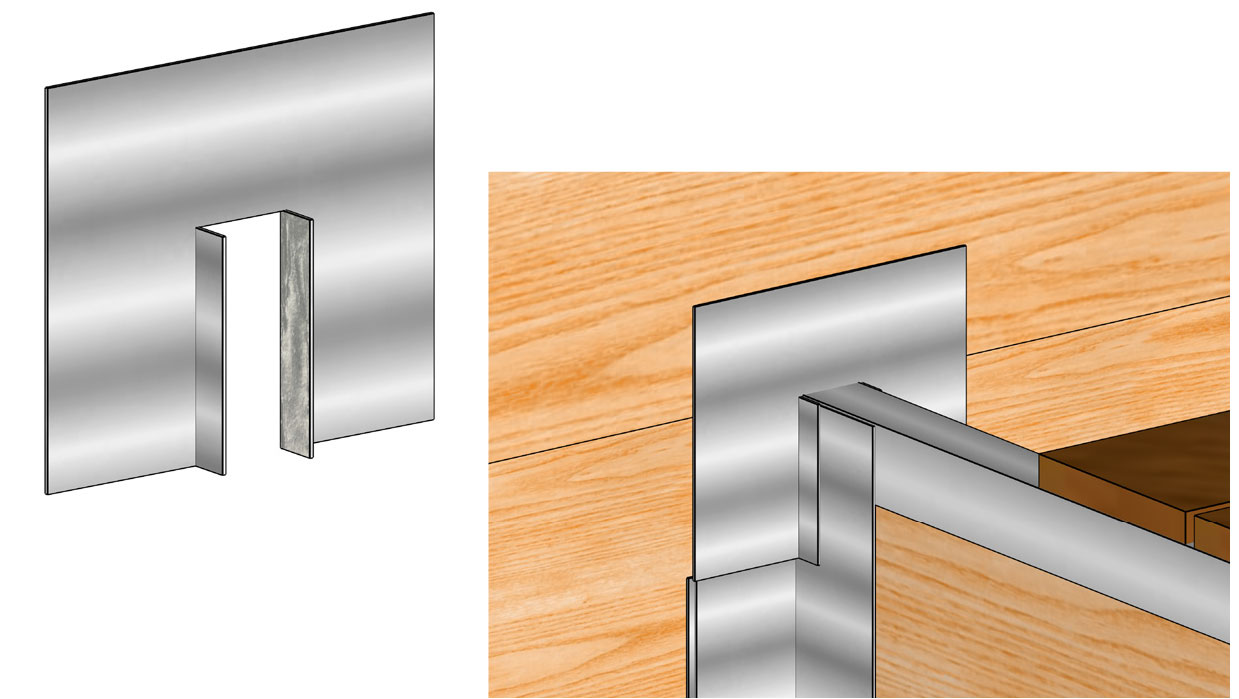
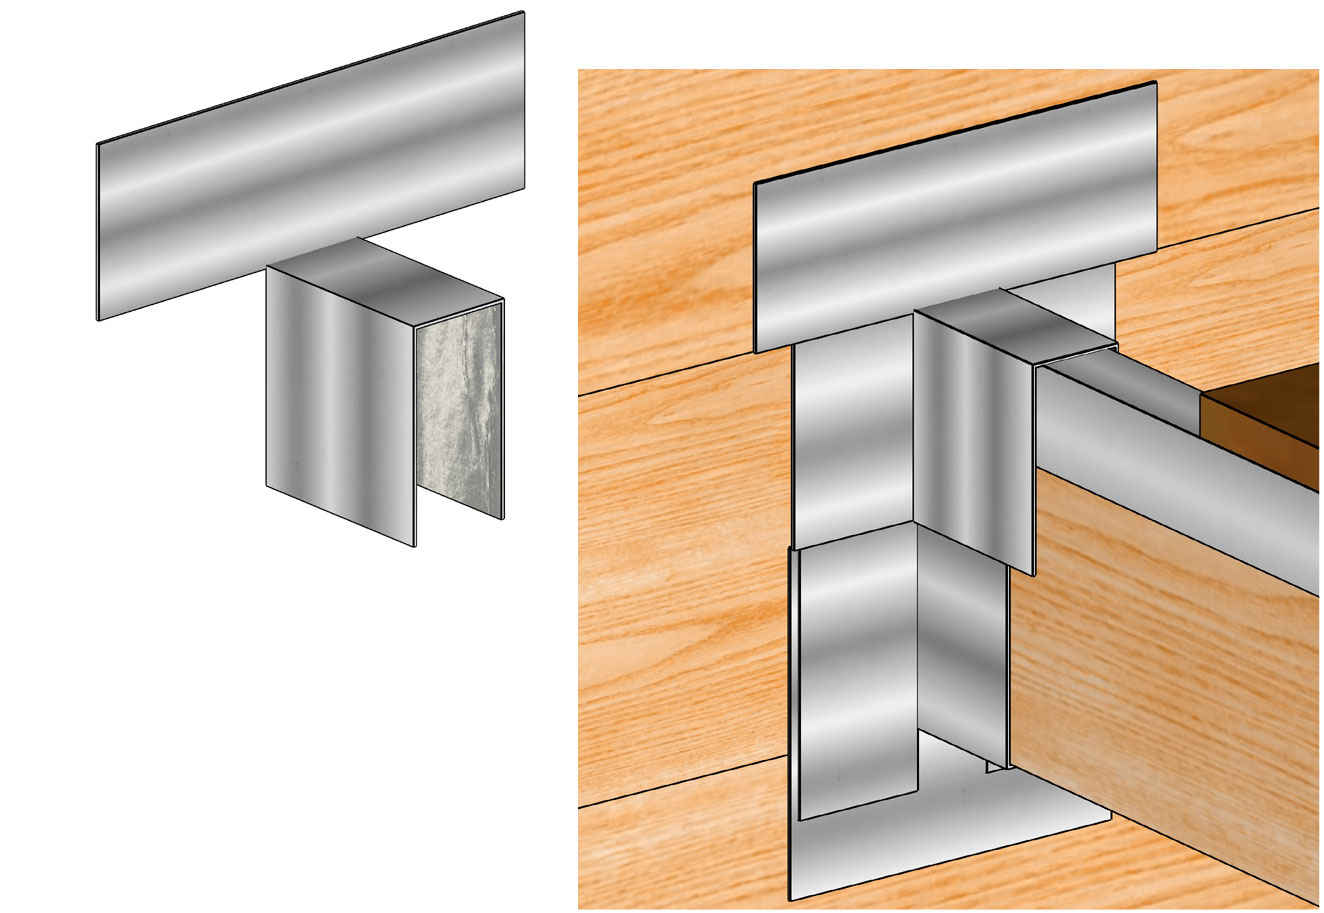
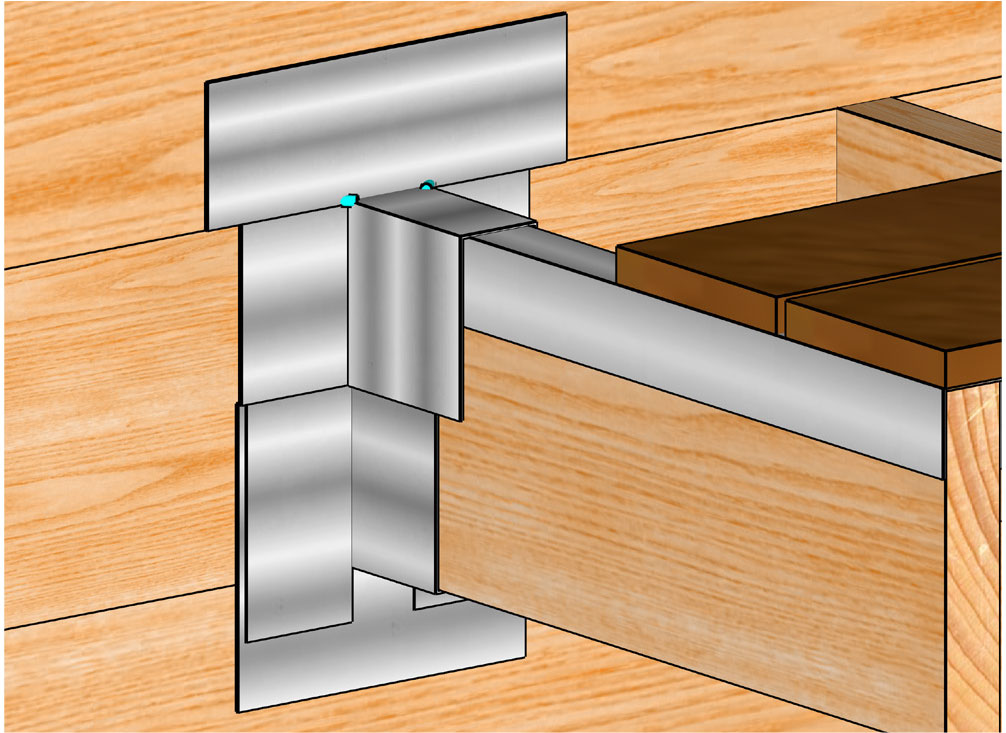
Saddle Flashing
1.
2. 
3. 
4.
5.
6. 
York 304 SA
How to Fold an Inside Corner in a Recessed Window
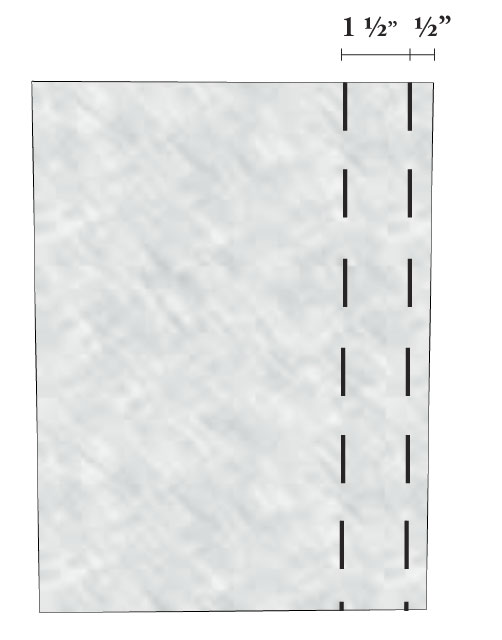
1. Fold the York 304 SA at the dotted lines
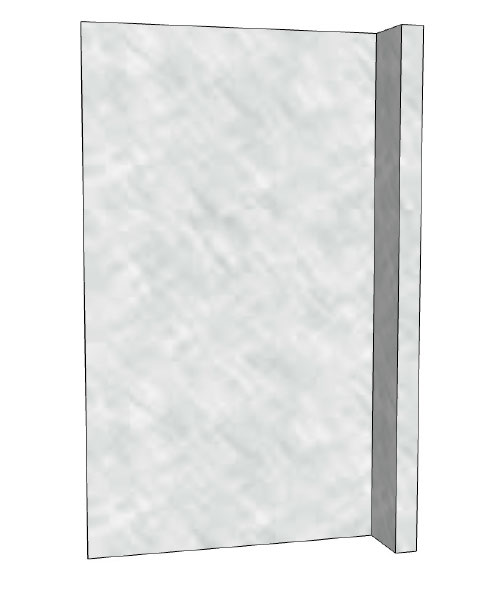
2. After creasing, lay the York 304 SA flat
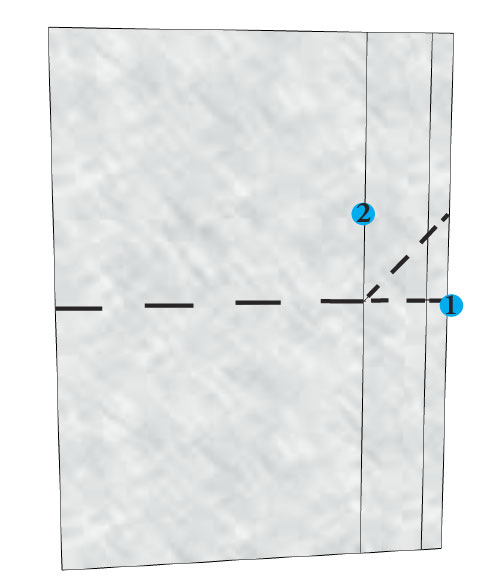
3. Crease the outside edges. Your corner is now ready to install
 4. Fold the York 304 SA at the dotted lines
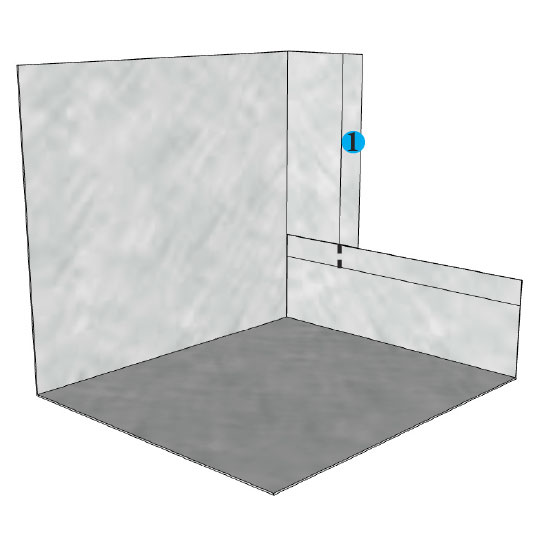
5. Pull point 1 back. Cut at dotted line
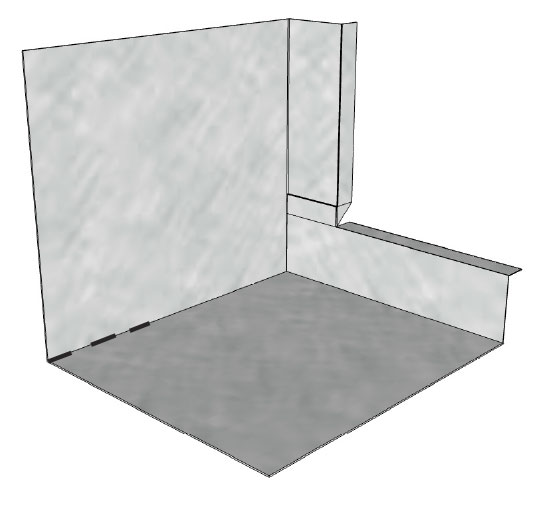
6. Fold the 2 top flanges back. Cut at dotted line (minimum of 2”)
 7. Crease the outside edges. Your corner is now ready to install
 Required: Cut a dovetail piece to detail the pinholes locations.